Banish the Noise: Expert Tips for Fixing Your Troublesome Garage Door
Your garage door is like the heartbeat of your home, constantly moving and ensuring that everything inside is safe and secure. But when that heartbeat begins to squeak and groan, it can be unsettling. Not only is it annoying, but it’s also a sign that something isn’t quite right with your garage door.
Don’t worry though, you don’t have to live with the constant noise or go through the trouble of completely replacing your garage door. With a little know-how and elbow grease, you can silence the squeak and get your garage door functioning smoothly once again.
In this article, we’ll provide you with tips on how to fix your problematic garage door so that it runs smoothly without any annoying squeaks or groans. From identifying the cause of the problem to lubricating moving parts and adjusting settings, we’ve got you covered.
We understand how frustrating it can be to deal with a noisy garage door- especially when it seems like no amount of WD-40 will do the trick! That’s why we’re here to help guide you through fixing your garage door so that you can feel confident in tackling this issue head-on.
So let’s get started!
Identify the Cause of the Squeak
Pinpointing the root of the irritating noise is crucial in addressing it effectively. There are several causes of garage door squeaks, and identifying which one is causing your particular problem will help you determine the appropriate solution.
Some common causes of garage door squeaks include worn-out rollers, loose hardware, and lack of lubrication on moving parts. One way to diagnose the cause of the squeak is to perform a visual inspection. Check for any damaged or worn-out parts such as rollers or hinges that may need replacement.
Tighten any loose nuts and bolts that may be causing vibrations leading to squeaking sounds. If you find no visible damage, try applying some lubricant to the moving parts like hinges and springs. Lubrication can often solve many minor issues with garage doors, so it’s worth trying before calling a professional repair service.
Lubricate the Moving Parts
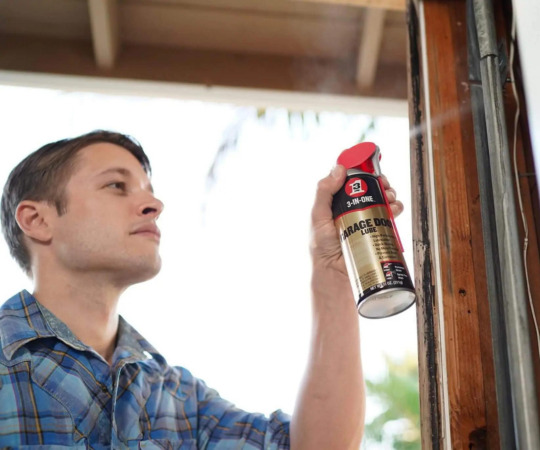
To effectively lubricate the moving parts of your garage door, it’s important to choose the right lubricant for the job. Look for a silicone-based or lithium-based lubricant that will withstand extreme temperatures and won’t attract dirt and debris.
When applying the lubricant, make sure to hit all the right spots, including hinges, springs, and bearings. Don’t forget to clean out any debris from tracks and rollers before applying the lubricant for best results.
Choose the Right Lubricant
Ensure that you select the appropriate lubricant to ensure smooth operation of your garage door mechanism. There are different types of lubricants to use for garage doors, including silicone-based and lithium-based ones.
Silicone-based lubricants are ideal for metal-to-metal contact parts as they don’t attract dust and dirt. On the other hand, lithium-based lubricants work best for hinges and tracks as they have a thicker consistency, making them last longer.
When applying lubricant, it’s essential to follow specific steps to achieve optimal results. Firstly, clean the parts with a dry cloth before application. Then apply the lubricant sparingly in small amounts on each moving part while avoiding getting any on non-moving parts such as weather seals or windows. Lastly, wipe off any excess using a clean cloth and operate the door several times to allow even distribution of the lubricant.
By choosing the right type of lubricant and following proper application techniques, you can make sure that your garage door operates smoothly without unwanted noise or friction. In the next section, we’ll discuss how to apply the lubricant to the right places for maximum effect without damaging any components in your garage door system.
Apply the Lubricant to the Right Places
You can easily apply the lubricant to all the necessary parts of your garage door mechanism, ensuring smooth and quiet operation with just a few simple steps. First, make sure to clean the tracks and rollers thoroughly before applying any lubricant. This ensures that there aren’t any grime or dirt particles that may interfere with the proper application of the lubricant.
Next, apply the lubricant correctly by using only enough to coat each part lightly without overdoing it. Common lubricant mistakes include using too much or too little, which can both lead to unwanted results such as attracting more dust and debris or not providing enough protection against wear and tear.
Once you’ve applied the lubricant correctly, test your garage door’s operation several times to ensure that it moves smoothly without any squeaks or jerks. With these simple tips in mind, you’ll be able to keep your garage door in excellent condition for years to come while avoiding costly repairs down the line.
To take your maintenance efforts one step further, you can also clean the tracks and rollers regularly to prevent buildup from interfering with their functioning. By keeping everything in good working order, you’ll be able to enjoy a safe and reliable garage door system that’ll protect your home and belongings for many years ahead.
Clean the Tracks and Rollers
Cleaning the tracks and rollers is an important step in maintaining a smooth and reliable operation for your garage door mechanism. Over time, dirt and debris can accumulate on the tracks and rollers, causing them to become clogged or damaged. This can result in a noisy or malfunctioning garage door that may be difficult to open or close.
To prevent these issues from occurring, it’s important to perform regular preventive maintenance on your garage door by cleaning the tracks and rollers. One of the most common mistakes people make when cleaning their garage door tracks and rollers is using harsh chemicals or abrasive materials. These can scratch or damage the surface of the metal, making it more susceptible to rust or other forms of corrosion.
Instead, use a mild soap solution and a soft-bristled brush to gently scrub away any dirt or debris that may have accumulated on the surface of the track or roller. Once you’ve finished cleaning, be sure to wipe down all surfaces with a clean cloth to remove any excess moisture.
Now that your tracks and rollers are clean, it’s time to move onto tightening any loose hardware for optimal performance.
Tighten Loose Hardware
Tightening loose hardware is crucial for ensuring your garage door operates smoothly and can reduce the risk of accidents. Studies show that up to 30% of garage door accidents are caused by loose or broken parts.
Preventive maintenance is key, so make sure to inspect your hardware regularly and tighten any bolts, nuts, or screws that have come loose. This will not only prevent further damage but also save you money on costly repairs in the long run.
DIY solutions are also available if you’re feeling confident enough to tackle the problem yourself. However, it’s important to note that some parts may require specialized tools or expertise. If you’re unsure about what needs fixing or how to do it properly, it’s always best to seek professional help.
With that said, taking care of small issues like tightening loose hardware can go a long way in keeping your garage door running smoothly and preventing accidents. In the next section, we’ll discuss how replacing worn-out parts can improve your garage door’s performance even further.
Replace Worn-Out Parts
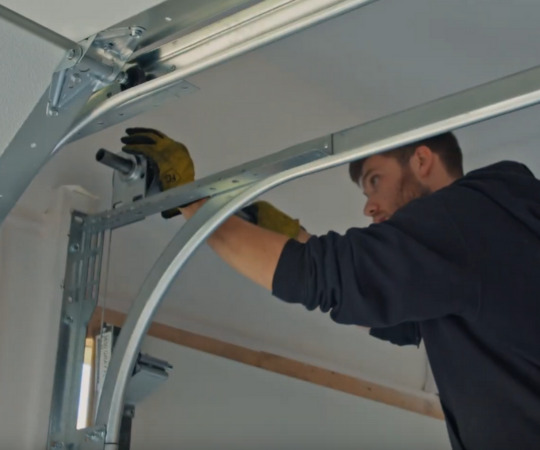
If you find that your garage door isn’t functioning as well as it once did, it might be time to replace some of its worn-out parts.
To begin with, identify the specific components that need replacement so you can secure the right kind of parts for the job.
It’s important to choose high-quality replacement parts and follow the manufacturer’s instructions carefully. This will ensure that your garage door stays in good condition for years to come.
Identify the Parts That Need Replacement
It’s important to pinpoint the worn-out components that require replacement in order to ensure your garage entryway operates smoothly and efficiently.
Some of the parts that commonly need replacing include the springs, cables, rollers, and hinges. These components can wear out over time due to frequent usage or lack of maintenance.
It’s essential to keep up with a regular maintenance schedule to identify these issues before they become major problems.
When it comes to replacement options, there are many choices available on the market. However, not all parts are created equal. Choosing high-quality replacement parts is crucial for ensuring longevity and reliability in your garage door system.
In the next section, we’ll discuss some tips for selecting the best replacement components for your specific needs.
Choose High-Quality Replacement Parts
In this section, we’ll talk about choosing top-notch replacement parts that will ensure your garage entryway functions smoothly and without hiccups. Benefits of investing in high-quality parts are aplenty.
For starters, they last longer than low-quality components, which means fewer repairs and less money spent over time. Additionally, high-quality parts provide better performance and reduce the likelihood of accidents.
When selecting replacement parts for your garage door repair project, there are common mistakes to avoid. Firstly, don’t settle for cheaper alternatives just because they seem like a bargain at the moment – you’ll end up paying more in the long run when they fail prematurely.
Secondly, make sure you choose parts that are compatible with your existing system; otherwise, you may have to replace other components as well. Lastly, always purchase from reputable suppliers who offer warranties on their products.
By following these tips, you can be confident that your garage door will operate smoothly for years to come. As we move onto the next section about following manufacturer’s instructions…
Follow the Manufacturer’s Instructions
By following the manufacturer’s instructions, you can ensure that your garage entryway operates at its best and avoid any potential mishaps down the line. The importance of following instructions cannot be emphasized enough when it comes to repairing your garage door.
These instructions are designed specifically for your model of door, and taking shortcuts or deviating from them can lead to further problems. One common mistake people make is assuming they know better than the manufacturer and skipping steps in the installation or repair process. This can cause long-term damage to your garage door or even put you in danger if the door malfunctions unexpectedly.
Another common mistake is not reading through all of the instructions before beginning a job, which could result in missing important details that affect how well your garage door operates. When following manufacturer’s instructions, take note of specific warnings and requirements listed as they are critical for proper installation or repair.
Now that you understand why it’s important to follow the manufacturer’s instructions, let’s move on to adjusting the door’s settings for optimal performance.
Adjust the Door’s Settings
Now that you’ve replaced worn-out parts, it’s time to fine-tune your garage door’s settings. This will ensure that it operates smoothly and safely.
The three key adjustments you need to make are the limit switches, chain tension, and spring tension.
Adjust the paragraph structure in the Input to logically group complete sentences on their own lines, with a double new line after. Use contractions.
Adjust the Limit Switches
Adjusting the limit switches can make a world of difference and ensure your garage stays secure. If you’ve been experiencing issues with your garage door opener, it may be due to the limit switches being out of adjustment.
Limit switch troubleshooting isn’t as complicated as it sounds and can easily be done by homeowners themselves with some basic tools. To adjust the limit switches, start by locating them on the side of your garage door opener motor unit.
Use a screwdriver to adjust the up-limit switch first, turning it clockwise to decrease or counterclockwise to increase its sensitivity. Then, adjust the down-limit switch in the same manner, making sure that both are set correctly so that they engage at exactly where you want them to stop.
Once you’ve made these adjustments, test your garage door opener again to see if it has solved any problems you were having previously. If not, then move onto DIY limit switch adjustment for even more fine-tuning of this important component.
With proper limit switch adjustment complete, it’s time now to move onto adjusting chain tension for optimal performance and noise reduction.
Adjust the Chain Tension
You’ll want to make sure the chain on your opener is taut, but not overly tight, in order to ensure smooth and reliable operation of your opener. Chain adjustment techniques vary depending on the type of opener you have.
Some openers use a threaded rod that can be turned with a wrench to adjust the tension, while others require adjusting nuts on the chain itself.
Common chain tension issues include slack or sagging chains, which can cause jerky movement and damage to other components. To fix this issue, start by disconnecting the opener from power and manually lifting up the garage door until it’s halfway open.
Check for any slack in the chain and adjust as necessary using your preferred method. Once you’ve adjusted the tension, test out your garage door opener to see if it operates smoothly and reliably before moving onto adjusting spring tension.
Adjust the Spring Tension
Proper adjustment of spring tension is crucial for the smooth and safe operation of your opener, so make sure to follow the manufacturer’s instructions and use caution when handling these powerful components. Spring maintenance includes tightening or loosening the tension on your springs as needed.
If you notice that your door isn’t opening or closing smoothly, it may be time to adjust the spring tension. Here are some safety precautions to keep in mind when adjusting spring tension:
- Wear safety glasses and gloves to protect yourself from any potential injuries.
- Make sure the door is fully closed before attempting any adjustments.
- Turn off power to your garage door opener before starting work.
Common mistakes include trying to adjust the tension without proper knowledge or experience. DIY solutions can sometimes lead to more problems if not done correctly. If you’re unsure about how to adjust your spring tension, seek professional help for a safer and smoother functioning garage door system.
Seek Professional Help if Needed
If all else fails, don’t hesitate to call in the pros. Seeking professional assistance is always a good idea when dealing with problematic garage doors.
There are some issues that may be too complex for you to handle, especially if you lack technical expertise or the right tools. If your garage door problem involves electrical components like the opener motor or wiring, it’s best to leave it to professionals who can work safely and efficiently.
When to call a professional? If you’ve already tried adjusting the spring tension and lubricating all moving parts but still experience persistent problems such as uneven movement or loud noises, then it’s time to pick up the phone and call for help.
A trained technician can diagnose your garage door issue accurately and offer appropriate solutions that could save you time and money in the long run. Remember that dealing with garage doors requires precision and caution; thus, entrusting repairs to experts is always a wise move.
Frequently Asked Questions
How much does garage door repair typically cost?
Garage door repair cost can vary depending on several factors. It’s important to understand what affects the cost of repairs so you can budget accordingly.
Some factors that affect garage door repair cost include the type of repair needed, the severity of the problem, and the time it takes to complete the repair. For example, a simple fix like lubricating hinges may only cost a few dollars, while replacing a broken spring could run several hundred dollars.
Other factors that may impact your garage door repair costs include labor charges and travel fees for technicians. To get an accurate estimate for your garage door repair needs, it’s best to consult with a professional who has experience in this area and can provide detailed information about pricing structures and options available to you.
Can I perform garage door repairs myself, or should I always seek professional help?
When it comes to garage door repairs, the question of DIY vs professional help is a common one. While there are certain tasks that can be done on your own, such as lubricating hinges and rollers or cleaning tracks, more complex repairs like replacing springs or cables should always be left to the professionals.
Safety measures should also be taken into consideration, as garage doors can weigh hundreds of pounds and pose a serious risk if mishandled. Always wear protective gear and follow manufacturer instructions carefully.
Ultimately, deciding whether to tackle a repair yourself or seek professional help will depend on your level of experience and comfort with the task at hand. But remember, safety should always come first.
How often should I lubricate the moving parts of my garage door?
To keep your garage door functioning smoothly, it’s important to lubricate the moving parts regularly. The best lubricants for garage doors are silicone-based and Teflon-based products. These types of lubricants offer long-lasting protection against rust and corrosion.
As for frequency of lubrication, it’s recommended to do this at least twice a year – preferably before winter and summer. However, if you live in an especially humid or dusty area, you may need to lubricate more frequently.
By taking care of your garage door with regular maintenance like lubrication, you can avoid costly repairs down the line and ensure that your door lasts as long as possible.
Are there any safety precautions I should take before attempting to fix my garage door?
Before attempting to fix your garage door, it’s essential to take pre-repair precautions and equip yourself with proper safety equipment. DIY risks can be dangerous, especially when dealing with heavy machinery like garage doors.
It’s always best to hire a professional technician who has the experience and knowledge to handle such repairs safely. If you choose to go ahead with the repair on your own, make sure you have all necessary tools and equipment. Wear appropriate clothing that covers your body entirely, including shoes with non-slip soles and gloves for added protection.
Keep in mind that any mistakes during the repair process can result in significant damages or injuries, and professional liability may not cover them. With careful consideration for safety measures, you’ll avoid any potential risks while fixing your problematic garage door.
How long does it typically take to repair a squeaky garage door?
If you’re dealing with a squeaky garage door, you may be wondering how long it typically takes to fix the problem. The truth is that it can vary depending on the cause of the squeak.
One common culprit is lack of lubrication, so it’s important to make sure you’re regularly lubricating your garage door – at least once a year is recommended. If this is the issue causing your squeak, simply adding some lubricant should take care of the problem relatively quickly.
However, if there are other underlying issues causing your garage door to make noise, such as loose parts or improper alignment, it may take longer to diagnose and repair those problems.
It’s always best to consult a professional if you’re unsure about what’s causing your squeaky garage door and how long it will take to fix.
Conclusion
In conclusion, fixing a squeaky garage door may seem like a daunting task, but it can be done easily with the right tools and knowledge. You must first identify the cause of the issue by inspecting your garage door thoroughly.
Once you’ve determined the source of the sound, lubricate all moving parts to reduce friction and tighten any loose hardware to prevent further damage. If worn-out parts are causing the squeak, then replacing them is crucial.
For example, John noticed that his garage door was making a loud noise every time he opened or closed it. After examining his garage door, he found out that one side was lower than the other due to worn-out rollers. He replaced them with new ones and lubricated all moving parts which resulted in a smooth operation of his garage door without any noises.
Remember to adjust your door’s settings accordingly if needed and always seek professional help if you’re unsure about how to proceed. By following these simple tips and tricks for fixing your problematic garage doors, you’ll save money on repairs while ensuring that your home remains secure and functional for years to come!
Related Source

